DIY home improvement offers a rewarding way to enhance your living space, from simple updates to ambitious renovations. It empowers you to personalize your home, increase its value, and save money in the process. Whether you’re a seasoned DIY enthusiast or a curious beginner, there’s a project waiting to be tackled.
This comprehensive guide explores the fundamentals of DIY home improvement, covering everything from planning and budgeting to tackling specific projects like painting, flooring, plumbing, and electrical work. We’ll delve into design ideas, provide practical tips, and offer valuable resources to help you navigate the exciting world of DIY.
DIY Home Improvement Basics

Taking on DIY home improvement projects can be a rewarding experience, allowing you to personalize your space, save money, and gain a sense of accomplishment. Whether you’re tackling a small project like painting a room or embarking on a more complex renovation, understanding the fundamentals of DIY is essential.
Essential Tools for Beginners
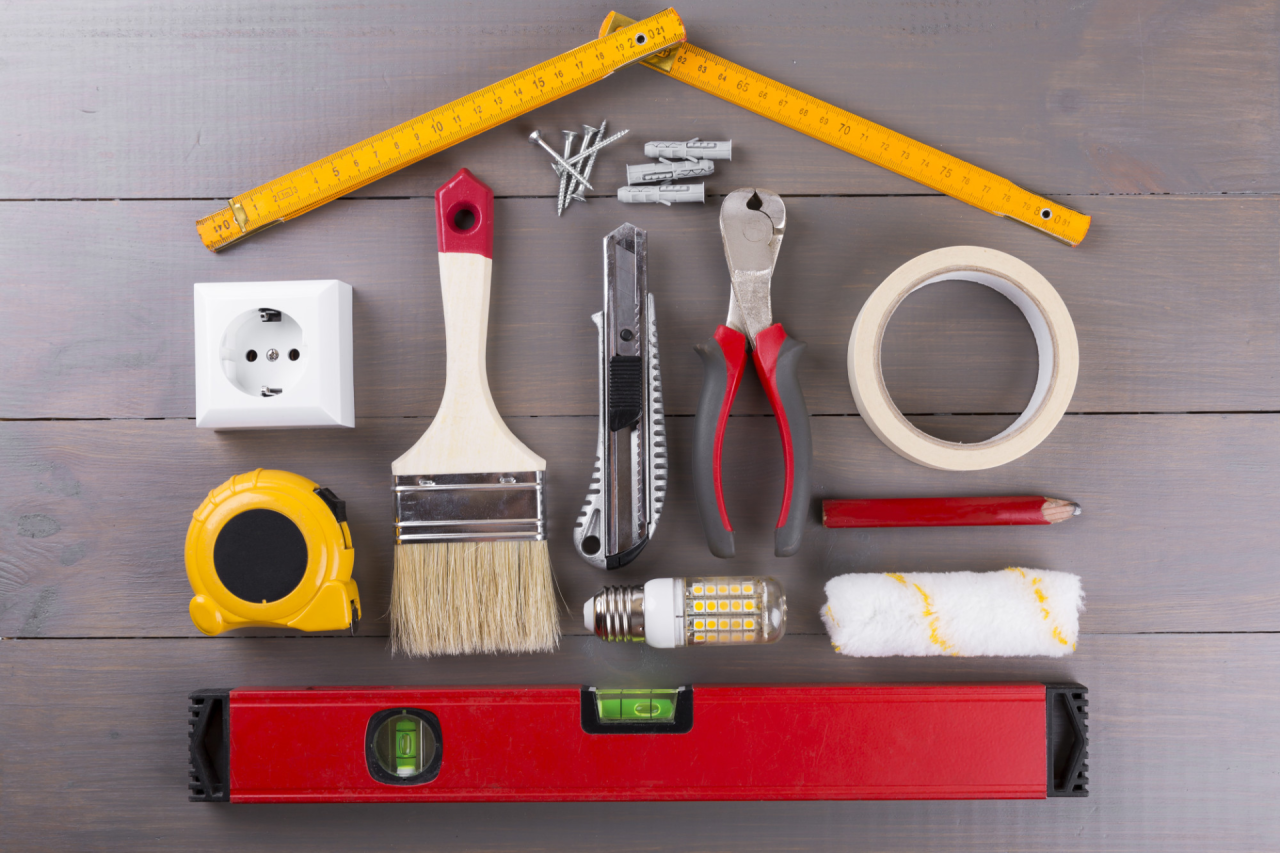
A well-equipped toolbox is crucial for any DIY enthusiast. Having the right tools can make your projects easier, safer, and more efficient. Here’s a list of essential tools for beginners:
- Hammer: A versatile tool used for driving nails, removing nails, and light demolition. Choose a claw hammer for general use.
- Screwdriver Set: Essential for assembling furniture, installing fixtures, and tightening screws. A set with both Phillips and flathead screwdrivers is recommended.
- Measuring Tape: Used for accurate measurements of lengths, widths, and depths. A retractable tape measure with a locking mechanism is ideal.
- Level: Ensures that surfaces are straight and even. A 24-inch level is a good starting point.
- Utility Knife: A versatile tool for cutting various materials, including cardboard, tape, and even some types of flooring. Choose a knife with replaceable blades.
- Pliers: Used for gripping, twisting, and bending objects. A set of pliers with different jaw sizes is recommended.
- Drill: A powerful tool for drilling holes, driving screws, and mixing paint. A cordless drill with multiple speed settings is ideal for most DIY projects.
Safety Tips for Home Improvement Projects
Safety should always be a top priority when working on home improvement projects. Here are some essential safety tips to keep in mind:
- Wear Protective Gear: Always wear safety glasses, work gloves, and a dust mask to protect your eyes, hands, and respiratory system from potential hazards.
- Use Proper Tools and Equipment: Ensure that all tools and equipment are in good working condition and are used for their intended purpose.
- Read Instructions Carefully: Before starting any project, carefully read and understand the instructions for the tools, materials, and procedures involved.
- Work in a Well-Ventilated Area: When using paints, solvents, or other chemicals, ensure that the work area is well-ventilated to prevent fumes from building up.
- Be Aware of Electrical Hazards: Always disconnect power to circuits before working on electrical wiring or fixtures. Use caution when working near electrical outlets or appliances.
- Use Ladders Safely: When using ladders, make sure they are on a stable surface, are the right height for the job, and are secured properly. Never stand on the top rung of a ladder.
- Take Breaks: Avoid fatigue by taking breaks when needed. This will help you stay focused and reduce the risk of accidents.
Planning & Budgeting
Planning and budgeting are crucial for a successful DIY home improvement project. A well-defined plan helps you stay organized, manage your time effectively, and ensure the project is completed within your desired scope. A realistic budget helps you avoid overspending and keeps you on track financially.
Creating a Detailed Project Plan
A detailed project plan Artikels every step involved in your DIY project, from initial planning to final completion. This plan serves as a roadmap, ensuring that you don’t miss any crucial steps and allows you to anticipate potential challenges.
- Define the project scope: Clearly define the project’s goals and objectives. What are you trying to achieve with this project? What are the specific tasks involved?
- Create a timeline: Break down the project into manageable tasks and assign a realistic timeframe for each. This helps you track progress and stay on schedule.
- Identify required materials and tools: Make a detailed list of all materials, tools, and equipment needed for the project.
- Consider potential challenges: Anticipate potential roadblocks and plan for contingencies. This can include unforeseen delays, material shortages, or unexpected costs.
- Document everything: Maintain a detailed record of your project plan, including sketches, measurements, material lists, and any other relevant information.
Creating a Realistic Budget
A realistic budget is essential for avoiding financial surprises and ensuring that your DIY project stays within your financial limits. It’s crucial to account for all expenses, including materials, tools, labor, and any unexpected costs.
- Research material costs: Get quotes from multiple suppliers for the materials you need. Consider using online resources like Home Depot or Lowe’s to compare prices.
- Factor in tool costs: If you need to purchase new tools, factor those costs into your budget. Consider renting tools if you only need them for a short period.
- Account for labor costs: If you’re hiring professionals for any part of the project, factor in their labor costs.
- Include contingency funds: Always include a buffer for unexpected expenses, such as material price increases, damage repairs, or additional labor costs.
Finding Affordable Materials and Supplies
Finding affordable materials and supplies can significantly impact your project’s overall cost. There are several strategies you can employ to save money without compromising quality.
- Shop around for deals: Compare prices from different retailers and take advantage of sales, coupons, and discounts.
- Consider used or salvaged materials: Check local salvage yards or online marketplaces for used or reclaimed materials.
- Utilize free or low-cost resources: Look for free or low-cost resources, such as free pallets, scrap wood, or discarded tiles.
- Get creative with your materials: Explore alternative materials that are both affordable and functional.
Painting & Staining: Diy Home Improvement
Painting and staining are essential DIY skills that can transform the look and feel of your home. Whether you’re freshening up a room, giving furniture a new lease on life, or protecting your outdoor structures, understanding the basics of paint and stain application will help you achieve professional-looking results.
Types of Paint, Diy home improvement
Different types of paint are designed for specific applications and surfaces. Choosing the right paint is crucial for achieving the desired finish and durability.
- Acrylic Paint: A versatile and popular choice for both interior and exterior projects. Acrylic paints are water-based, making them easy to clean up and low in odor. They dry quickly, offer excellent adhesion, and are available in a wide range of colors and finishes, including matte, satin, semi-gloss, and gloss.
- Latex Paint: Similar to acrylic paint, latex paint is water-based and known for its durability, ease of application, and low VOC content. It’s commonly used for interior walls and ceilings, offering good coverage and resistance to mildew.
- Oil-Based Paint: Traditional oil-based paints offer superior durability and a smooth, hard-wearing finish. They are often preferred for trim, doors, and furniture, as they resist scratches and stains better than water-based paints. However, oil-based paints require mineral spirits for cleanup, take longer to dry, and emit stronger odors.
- Epoxy Paint: This durable and chemical-resistant paint is ideal for high-traffic areas and surfaces exposed to harsh conditions. Epoxy paints are commonly used for garage floors, countertops, and other surfaces that require a tough, non-porous coating.
Painting a Room
Painting a room is a common DIY project that can refresh the look of your space. Here’s a step-by-step guide to painting a room like a pro:
- Prepare the Room: Start by removing all furniture, artwork, and accessories from the room. Cover the floor with drop cloths or plastic sheeting to protect it from paint splatters. Use painter’s tape to mask off trim, windows, doors, and any other areas you don’t want to paint.
- Patch and Prime: Fill any holes or cracks with spackling compound and allow it to dry completely. Sand the patched areas smooth to create a seamless finish. Prime the walls with a suitable primer to ensure proper adhesion and coverage for the paint.
- Choose Your Paint: Select the right type and finish of paint for your project. Consider the room’s purpose, light conditions, and desired aesthetic.
- Apply the First Coat: Use a high-quality paint brush or roller to apply the first coat of paint. Start at the top of the wall and work your way down, using smooth, even strokes.
- Apply Additional Coats: Allow the first coat to dry completely before applying a second coat. Two coats are usually sufficient for full coverage and a smooth finish.
- Clean Up: Once the paint is dry, remove the painter’s tape and dispose of any leftover paint and supplies properly.
Staining Wood
Staining wood is a popular way to enhance its natural beauty and create a rich, protective finish. Here’s a breakdown of the staining process:
- Prepare the Wood: Sand the wood surface with progressively finer grits of sandpaper to remove any imperfections, dust, and debris. This will ensure that the stain penetrates evenly.
- Choose Your Stain: Select a stain that complements the wood’s grain and color. Consider the desired shade, finish, and durability.
- Apply the Stain: Use a brush, cloth, or sponge to apply the stain to the wood surface. Work in the direction of the grain for a natural appearance.
- Wipe Off Excess Stain: After applying the stain, use a clean cloth to wipe off any excess stain within the recommended time frame. This will prevent uneven coloring and blotching.
- Apply a Finish: Once the stain has dried completely, you can apply a sealant or topcoat to protect the wood from moisture, scratches, and UV damage. Polyurethane, varnish, or wax are common finishing options.
Outcome Summary

With a little planning, patience, and the right tools, you can transform your home into a haven that reflects your unique style and personality. DIY home improvement is not just about creating a beautiful space, it’s about empowering yourself to take control of your home and build something truly special. So, roll up your sleeves, gather your supplies, and embark on a journey of DIY home improvement!
DIY home improvement projects can be a rewarding way to personalize your space. Sometimes, though, you might need a break from the hammer and nails. A fun, creative outlet like making clay earrings DIY can be a great way to relax and express yourself.
Once you’ve finished your new earrings, you can return to your home improvement projects with renewed energy and a fresh perspective.


