Recuva, the unsung hero of digital data recovery, is your go-to tool when you accidentally delete that crucial essay, those irreplaceable photos, or any other vital file. It’s like having a digital time machine, capable of resurrecting lost data from your hard drive, USB, or even memory cards. But how does it actually work? What are its limitations?
And is it really as easy to use as they say? Let’s dive in and find out!
This guide will cover Recuva’s core functionality, from its simple quick scan to its more intensive deep scan, exploring the various file types it handles and the nuances of its user interface. We’ll also discuss safety features, performance benchmarks, and troubleshooting tips to help you get the most out of this powerful data recovery tool. Think of it as your comprehensive Recuva survival guide – no more panicked searches for lost files!
Recuva’s Core Functionality
Recuva, a free data recovery tool, excels at retrieving accidentally deleted files from various storage media. Its effectiveness stems from a combination of scanning techniques and a user-friendly interface that simplifies the recovery process, even for users with limited technical expertise. Understanding its core functionality allows users to maximize its potential and successfully recover lost data.Recuva’s primary data recovery methods rely on analyzing the file system and searching for file signatures.
When a file is deleted, it isn’t immediately erased from the storage device; instead, the space it occupied is marked as available for new data. Recuva works by scanning this space, identifying remnants of deleted files, and attempting to reconstruct them. This process is significantly more successful when the deleted files haven’t been overwritten by new data.
Scan Options in Recuva
Recuva offers several scan options to tailor the recovery process to the user’s specific needs. Choosing the right scan option directly impacts the speed and thoroughness of the data recovery. A poorly chosen scan can either lead to wasted time or miss potentially recoverable files.
- Quick Scan: This is the default and fastest option. It quickly scans the Recycle Bin and recently deleted files, suitable for recently deleted items.
- Deep Scan: This option performs a more thorough search, analyzing the entire storage device for deleted files. This takes longer but has a higher chance of finding files that a quick scan might miss. It’s ideal when a quick scan doesn’t yield the desired results.
Recovering Deleted Files with Recuva
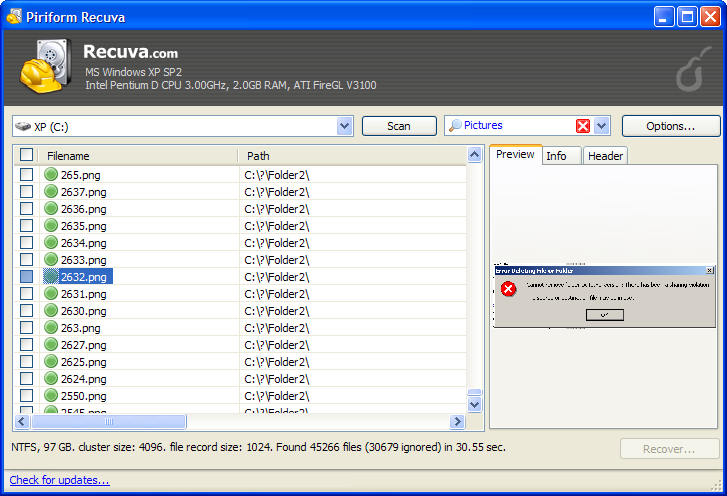
The process of recovering deleted files using Recuva is straightforward and intuitive. After selecting a scan type, Recuva displays a list of found files. Users can preview certain file types before initiating the recovery. Files are categorized based on their type and status, indicating the likelihood of successful recovery. The recovery process involves selecting the desired files and choosing a destination folder for the recovered items.
It’s crucial to avoid saving the recovered files to the same location from where they were deleted, as this could overwrite the recovered data.
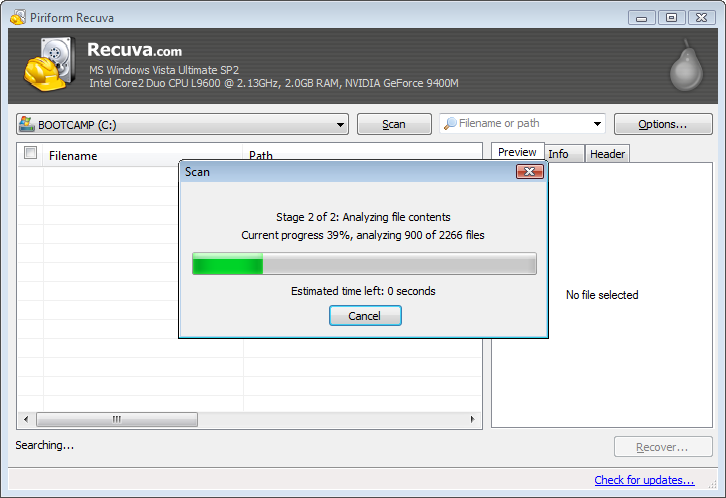
Deep Scan vs. Quick Scan
Recuva’s deep scan and quick scan differ significantly in their approach and effectiveness. The quick scan is a superficial search focusing on readily identifiable deleted files, making it fast but potentially less comprehensive. In contrast, the deep scan is a more in-depth analysis that digs deeper into the file system, recovering files even if their file system entries are completely removed or fragmented.
While a quick scan might suffice for recently deleted files, a deep scan is necessary for older or more thoroughly deleted files. The trade-off is speed versus thoroughness; a deep scan will take considerably longer but has a much higher chance of recovering files that a quick scan would miss. For example, if you deleted a file a week ago and a quick scan didn’t find it, a deep scan might be your only option to retrieve it.
However, be prepared for a significantly longer wait time.
File Types Recuva Supports
Recuva, a popular freeware data recovery tool, boasts a wide range of supported file types, making it a versatile option for recovering lost or deleted files. However, its effectiveness varies depending on the file type and the circumstances of the data loss. Understanding these nuances is key to successfully using Recuva.Recuva’s ability to recover files hinges on how the file system manages data and how much the original file data has been overwritten.
Certain file types are more easily recovered because of their structure and how they are saved. Others are trickier due to their complexity or the way they’re handled by the operating system.
File Types Recuva Recovers Effectively
Recuva generally excels at recovering common file types like documents (`.doc`, `.docx`, `.pdf`, `.txt`), images (`.jpg`, `.jpeg`, `.png`, `.gif`), audio files (`.mp3`, `.wav`, `.ogg`), and videos (`.mp4`, `.avi`, `.mov`). These file types often have a relatively straightforward structure, making them easier for Recuva’s algorithms to identify and reconstruct. The success rate for these types is generally high, especially if the files haven’t been overwritten by new data.
File Types Recuva Struggles With
While Recuva handles many file types well, it faces challenges with certain formats. Highly fragmented files, those spread across multiple sectors on the hard drive, are difficult to recover completely. Similarly, files that are heavily compressed or encrypted present significant obstacles. Database files (`.mdb`, `.accdb`) and some specialized software files can also be problematic due to their complex internal structures.
The recovery success rate for these types is significantly lower, often resulting in corrupted or incomplete files.
Factors Affecting Recovery Success Rates
Several factors influence Recuva’s success in recovering different file types. The most crucial is the extent of data overwriting. If new data has been written to the sectors where the deleted file resided, the recovery chances diminish dramatically. The file system itself also plays a role; some file systems (like NTFS) offer better metadata tracking, aiding in recovery.
The file’s size matters too; larger files take up more space, increasing the likelihood of overwriting. Finally, the health of the storage device itself can impact recovery; a failing hard drive can make recovery more difficult regardless of the file type. For example, a small text file deleted recently on a healthy SSD is far more likely to be recovered completely than a large video file deleted weeks ago from a failing hard drive.
Limitations of Recuva Regarding File Type Recovery
Recuva, despite its capabilities, isn’t a magic bullet. It cannot recover files that have been permanently overwritten or those lost due to hardware failure beyond simple data corruption. Additionally, it relies on identifying file signatures, meaning if the file’s signature is severely damaged or missing, recovery is unlikely. Recuva’s deep scan, while more thorough, takes significantly longer and doesn’t guarantee success for all file types, especially those with complex internal structures or extensive fragmentation.
It’s important to manage expectations; Recuva provides a good chance for recovery, but it’s not infallible.
Recuva’s User Interface and Navigation
Recuva boasts a surprisingly intuitive interface, considering the potentially complex task of data recovery. Even a first-time user should find themselves navigating the program with relative ease. Its straightforward design prioritizes user-friendliness, making the process of recovering lost files less daunting than it might seem. This section will break down the interface and offer tips for efficient navigation.
Step-by-Step Guide: Recovering a Specific File Type
To recover a specific file type, like a lost .docx file, follow these steps: First, launch Recuva. Select the location where you believe the file was saved (or choose “I’m not sure” for a broader scan). Then, click “Next.” Recuva will begin scanning. Once complete, you can filter the results using the “File Type” filter in the top-right corner.
Select “.docx” from the dropdown menu, and only .docx files will be displayed. Select the file you wish to recover and click “Recover.” Choose a recovery location (different from the original location is recommended for best results) and click “OK.”
Visual Representation of Recuva’s Main Interface
| Section | Description | Functionality | Example |
|---|---|---|---|
| Main Window | Displays the main interface with options for choosing scan location and file types. | Initiates the recovery process by selecting the location and starting a scan. | A window showing options like “I’m not sure” and specific drive locations. |
| Scan Results | Shows a list of recoverable files, organized by file type and status. | Allows users to filter and sort the results to find specific files. | A list of files with icons indicating their type and condition (e.g., good, poor). |
| File Preview | (If available) A preview of the selected file’s contents. | Helps users verify the file before recovery. | A small image or text preview of the selected file. |
| Recovery Options | Allows selection of files to recover and the destination folder. | Initiates the recovery process to the selected location. | Buttons and fields for selecting files and choosing a recovery location. |
Tips and Tricks for Efficient Navigation
Using the file type filter significantly speeds up the process of locating specific files after a scan. The preview feature (when available) helps confirm you’re recovering the correct file before committing to the recovery. Always recover files to a different location than their original location to avoid overwriting data. Deep scans take longer but increase the chance of finding lost files.
Comparison of Recuva’s Interface with a Competitor
Compared to a competitor like EaseUS Data Recovery Wizard, Recuva’s interface is noticeably simpler and more streamlined. EaseUS offers more advanced options and a more complex layout, which might be overwhelming for casual users. Recuva prioritizes ease of use, making it ideal for those needing a quick and easy recovery solution. EaseUS, while more powerful, might require a steeper learning curve.
Recuva’s Safety and Security Features
Recuva, while incredibly helpful for recovering lost files, isn’t a magic bullet. It operates within certain limitations and carries inherent risks. Understanding these aspects is crucial for responsible use and preventing further data loss or system compromise. This section Artikels Recuva’s built-in safeguards and the potential pitfalls to be aware of.Recuva employs several security measures to protect user data and prevent accidental damage.
It primarily focuses on minimizing the risk of overwriting existing data during the recovery process and avoiding any unintended modifications to the hard drive’s structure. The software operates read-only, meaning it doesn’t write anything to the drive unless you specifically instruct it to do so during the recovery and save process. This read-only approach significantly reduces the chance of causing further data loss.
Potential Risks Associated with Data Recovery Software
Using data recovery software always carries some level of risk. The primary concern is the potential for further data corruption if the software malfunctions or if the user makes incorrect choices during the recovery process. For example, selecting the wrong drive or partition during the scan could lead to accidental overwriting of important data. Improperly handling recovered files can also lead to issues.
Recovering a partially corrupted file might only partially restore it, and attempting to use the file might cause application errors or further damage. It’s also important to be aware that not all data is recoverable; severely damaged or overwritten data might be beyond the capabilities of any recovery software.
Recuva’s Measures to Prevent Data Corruption
Recuva minimizes data corruption risk through its careful design and operation. The software’s read-only mode, as previously mentioned, is a key preventative measure. Recuva also employs sophisticated algorithms to analyze the hard drive’s structure and identify recoverable files without making any unnecessary changes. The software’s preview function allows users to see a preview of the file before recovery, providing an opportunity to assess the file’s integrity before committing to a full recovery.
This preview functionality is a vital safeguard, helping users avoid recovering damaged or incomplete files that might further destabilize the system. The software also guides the user through the recovery process, presenting clear options and warnings to prevent accidental mistakes.
Recuva’s Handling of Overwritten Data
Recuva’s ability to recover overwritten data is limited. Once data is completely overwritten, recovery becomes extremely difficult, if not impossible. However, Recuva can often recover files that have been partially overwritten. The success rate depends on several factors, including the extent of the overwrite, the file system used, and the time elapsed since the data was overwritten.
Recuva’s deep scan mode attempts to recover data even from areas that the standard scan might miss, increasing the chances of finding partially overwritten files. It’s crucial to understand that recovered files might be incomplete or corrupted even when Recuva successfully retrieves them. The software makes no guarantees about data integrity after recovery; it only attempts to reconstruct the file to the best of its ability.
Regular backups remain the best protection against data loss.
Recuva’s Performance and Efficiency
Recuva’s speed and resource consumption are key factors determining its overall effectiveness. While generally efficient, its performance can vary based on several factors, including the type of storage device, the size of the file being recovered, and the overall health of the system. Understanding these variables helps users optimize their recovery process and manage expectations.Recuva’s performance characteristics across different storage media and a comparison against competing software will be examined, along with practical strategies for enhancing Recuva’s speed and efficiency.
Finally, we will explore how Recuva uses system resources during a scan.
Recuva’s Performance on Different Storage Devices
Recuva’s scanning speed differs noticeably between HDDs (Hard Disk Drives) and SSDs (Solid State Drives). On HDDs, the mechanical nature of reading data means scans can be significantly slower, especially for large drives or deeply fragmented files. The spinning platters and read/write heads need to physically move to access data, adding latency. In contrast, SSDs, with their flash memory, offer much faster read speeds, resulting in quicker scans and potentially faster recovery times.
This speed difference is directly related to the access time of the storage medium; SSDs have drastically lower access times compared to HDDs. A recovery from a 1TB HDD might take hours, while a similar recovery from a 1TB SSD might complete in minutes. The difference becomes even more pronounced when dealing with larger drives.
Comparison of Recuva’s Recovery Speed with Other Data Recovery Tools
Directly comparing Recuva’s recovery speed to other tools like PhotoRec or Disk Drill requires controlled testing across identical datasets and hardware. However, anecdotal evidence and user reviews suggest that Recuva’s speed is generally competitive for smaller files and simpler recovery scenarios. For complex recoveries involving extensive data fragmentation or large files, more specialized tools might offer faster performance.
The “deep scan” feature in Recuva, while more thorough, significantly increases scan time compared to a “quick scan”. Factors like the health of the storage device, the level of data corruption, and the complexity of the recovery process also significantly influence recovery times across all data recovery tools.
Strategies for Optimizing Recuva’s Performance
Several strategies can significantly improve Recuva’s performance. First, ensure your system has adequate RAM. Recuva, like any data recovery tool, is memory-intensive. Low RAM can lead to significant slowdowns or even crashes during scanning. Second, defragmenting the hard drive (for HDDs only) can help improve access times and speed up the scan.
This is particularly beneficial if the files you’re trying to recover were located in fragmented areas of the drive. Third, disabling unnecessary background processes and applications while Recuva is running frees up system resources, allowing Recuva to allocate more processing power to the scan. Finally, always use the “quick scan” option first unless you have reason to believe a “deep scan” is necessary.
The deep scan is far more thorough but significantly lengthier.
Recuva’s System Resource Utilization During a Scan
During a scan, Recuva utilizes CPU and RAM resources to process the data. The CPU is primarily responsible for analyzing the data structure, while RAM is used to store the data being processed. The intensity of resource utilization depends on several factors including scan type (quick or deep), the size of the storage device being scanned, and the complexity of the data.
A deep scan on a large hard drive will naturally consume more resources than a quick scan on a small SSD. Monitoring system resource usage using the Task Manager (Windows) or Activity Monitor (macOS) during a Recuva scan provides insight into its resource demands. You might observe a temporary increase in CPU and RAM usage, but typically, Recuva doesn’t hog system resources to the point of causing significant performance issues on modern hardware.
However, on older or less powerful systems, resource constraints might become noticeable.
Recuva’s Deep Scan Functionality
Recuva’s deep scan is a powerful tool, but it’s not always necessary. Understanding when to use it and its implications is key to efficient data recovery. A deep scan digs much deeper into your hard drive than a quick scan, examining every sector for traces of deleted files. This thoroughness comes at the cost of significantly increased scan time.Deep scans are computationally intensive, analyzing every nook and cranny of the storage medium.
This thorough approach significantly increases the chances of finding files that a quick scan might miss, especially those that have been overwritten or fragmented. However, this thoroughness comes with a trade-off: significantly longer scan times.
Advantages and Disadvantages of Deep Scans
Using a deep scan offers a greater chance of recovering data that’s been thoroughly deleted or overwritten. The comprehensive nature of the search makes it ideal for recovering files that have undergone multiple writes to the same location on the drive. However, deep scans consume significantly more time and system resources compared to quick scans. This can be a considerable drawback, especially for large drives or when time is of the essence.
Conditions Requiring a Deep Scan
A deep scan is necessary when a quick scan fails to locate the desired files. This often happens when files have been deleted and then overwritten, fragmented across multiple sectors of the hard drive, or if the file system has been significantly damaged. For instance, if you’ve recently formatted your drive or experienced a system crash, a deep scan is much more likely to yield results.
Another scenario is recovering files from an external drive that has been subjected to physical damage or corruption.
Quick Scan versus Deep Scan Time Comparison
The time difference between a quick and deep scan can be substantial. A quick scan might take a few minutes for a small drive with only a few recently deleted files, while a deep scan of the same drive could take hours, or even days, depending on the drive’s size and the level of fragmentation. For a large hard drive (e.g., a 2TB drive), a quick scan might take 30-60 minutes, while a deep scan could take 12-24 hours or more.
This significant time difference underscores the importance of choosing the appropriate scan type based on your needs and available time.
Examples of Deep Scan Effectiveness
Imagine a scenario where you deleted a large video file several weeks ago. A quick scan might not find it because the space it occupied has been partially or completely overwritten by new files. A deep scan, however, has a much better chance of recovering fragments of the video file, even if it’s not entirely intact. Similarly, if you’ve accidentally formatted a USB drive, a deep scan offers a much higher probability of recovering lost data compared to a quick scan.
The recovery process might still be challenging, but a deep scan significantly increases the chances of success. Recovering files after a hard drive failure often necessitates a deep scan due to the potential for severe data corruption.
Recuva’s File Preview Feature
Recuva’s file preview functionality is a seriously helpful feature that lets you peek inside a filebefore* you recover it. This sneak peek saves you time and potential headaches by letting you confirm you’ve found what you’re looking for and assess its condition. It’s like getting a quick look at the goods before you buy them, but for deleted files.Knowing what you’re recovering is crucial.
The file preview function in Recuva allows users to visually inspect the contents of a selected file before initiating the recovery process. This feature is particularly beneficial when dealing with numerous deleted files, as it helps prioritize recovery efforts and avoids unnecessary recovery of corrupted or unwanted files. This preview significantly reduces the time spent recovering files that may not be worth the effort.
File Preview Functionality
Recuva’s file preview works by attempting to read the file’s header and metadata. For many common file types like images, documents, and audio files, it can generate a thumbnail or display a portion of the file’s content directly within the Recuva interface. This preview is not a full rendering of the file; it’s a quick glimpse to verify its identity and potential integrity.
The more intact the file’s header, the better the preview.
Limitations of File Preview
Not all file types are equally previewable. Highly technical or obscure file formats might not show a preview, and severely damaged files might display a corrupted or incomplete preview. The preview is also limited in scope; it’s a quick look, not a full file analysis. For example, a large video file might only show a static frame, not a playable preview.
Furthermore, the preview doesn’t guarantee the file’s complete recoverability. A file might show a preview but still be partially corrupted upon recovery.
Assessing File Integrity Using File Preview
The file preview provides a visual cue about a file’s potential integrity. A clear and complete preview suggests a higher chance of successful recovery. Conversely, a corrupted or incomplete preview indicates potential data loss or damage. For example, an image file with a garbled preview is less likely to recover completely. By examining the preview, users can make informed decisions about which files to prioritize for recovery.
If the preview is completely blank or nonsensical, it’s a strong indication the file is likely unrecoverable.
Recuva’s Secure Overwrite Feature
Recuva’s secure overwrite function is a crucial feature for anyone concerned about the complete and irreversible deletion of sensitive data. Unlike simply deleting a file, which often leaves recoverable remnants, secure overwrite ensures that the data is truly gone, making recovery practically impossible, even with sophisticated data recovery tools. This is especially important for protecting confidential information like financial records, medical data, or anything containing personally identifiable information.The process of securely overwriting deleted files using Recuva is straightforward.
After selecting the files you want to securely delete, Recuva doesn’t simply remove the file pointers; instead, it repeatedly overwrites the file’s space on the hard drive with random data. This process makes it extremely difficult, if not impossible, for data recovery software to reconstruct the original file. The number of overwrites can be configured within Recuva’s settings, with more passes providing a higher degree of security.
This ensures that even the most tenacious data recovery attempts will fail to retrieve the original content.
Secure Overwrite Implications
Securely overwriting files consumes time and resources. The more overwrites you choose, the longer the process takes. This is a trade-off between security and convenience. For example, choosing a single overwrite might be sufficient for less sensitive data, while multiple overwrites are recommended for highly sensitive information where absolute data security is paramount. It’s important to consider this time investment when choosing this option.
Also, keep in mind that the process affects only the specific files targeted for secure deletion; other data on the drive remains untouched.
Comparison with Other Secure Deletion Methods
Recuva’s secure overwrite compares favorably to other methods like using specialized secure deletion software or manually overwriting files using command-line tools. Recuva offers a user-friendly interface, making the process accessible to users of all technical skill levels. Other methods often require more technical expertise and may not be as intuitive. While dedicated secure deletion tools might offer more advanced options or customization, Recuva provides a convenient and effective solution integrated directly into its data recovery functionality.
The convenience factor makes Recuva a strong contender for users seeking a simple yet robust secure deletion capability.
Recuva’s Portable Version
Recuva’s portable version offers a super convenient way to recover deleted files without needing to install the program. This is a huge plus for those who frequently use multiple computers, work with sensitive data on public machines, or just prefer to keep their systems lean and mean. Think of it as your own personal, on-the-go data recovery toolkit.The portable version functions essentially identically to the installed version, but with the key advantage of portability.
This means you can run it from a USB drive, external hard drive, or even a cloud storage service. No installation hassles, no system registry changes – just pure, unadulterated file recovery power wherever you go.
Using the Portable Version on Different Systems
The beauty of Recuva’s portable version is its simplicity. Just copy the extracted folder containing the Recuva executable onto any system running a compatible version of Windows. Double-click the Recuva executable (usually `recuva.exe`), and you’re good to go. No special setup or configuration is required; it’s ready to use immediately. This makes it incredibly versatile for use on laptops, desktops, and even shared computers in libraries or internet cafes without leaving any traces of your activity on the host machine.
So, Recuva’s pretty sweet for recovering accidentally deleted files, right? But what if you deleted important QuickBooks data? Thankfully, you can usually recover that stuff too, especially if you’re using quickbooks desktop and have backups set up. Then, if all else fails, you can always rely on Recuva to try and salvage anything else you’ve lost.
Functionality Comparison: Portable vs. Installed
The functionality between the portable and installed versions of Recuva is virtually identical. Both offer the same deep scan capabilities, file type support, and advanced features like secure overwrite. The only real difference lies in the installation method. The installed version modifies your system registry and installs files in your program files directory, whereas the portable version keeps everything self-contained within its own folder.
Scenarios Where the Portable Version is Advantageous
Several scenarios make the portable version a particularly smart choice. For example, if you’re a tech support professional, carrying a portable version on a USB drive allows you to recover data on a client’s computer without needing administrator privileges or installing software on their system. Similarly, it’s great for troubleshooting issues on multiple machines without the need to repeatedly install and uninstall the software.
Finally, using the portable version on a public computer ensures that your data recovery efforts leave no trace behind, protecting your privacy and preventing accidental modification of the host system’s settings.
Troubleshooting Common Recuva Issues

Recuva, while generally reliable, can sometimes throw you a curveball. Understanding common problems and their solutions can save you time and frustration when trying to recover precious files. This section Artikels typical issues users encounter and provides practical solutions to get you back on track. We’ll cover error messages, recovery failures, and general troubleshooting steps.
Common Recuva Errors and Solutions
A variety of errors can pop up during a Recuva scan or recovery attempt. These often stem from issues with the drive being scanned, insufficient permissions, or conflicts with other software. Understanding these errors is key to resolving them effectively.
| Error | Possible Cause | Solution | Example Scenario |
|---|---|---|---|
| “Unable to access the drive” | Drive is disconnected, faulty, or protected by write-protection. Insufficient permissions. | Check drive connections, run CHKDSK (Windows), ensure the drive isn’t write-protected, and verify user permissions. Restart your computer. | Trying to recover files from an external hard drive that’s not properly connected to the computer. |
| “Insufficient Disk Space” | The recovery process requires more free space on the target drive than is currently available. | Free up space on the drive where you’re saving recovered files. Consider saving recovered files to a different drive with more free space. | Attempting to recover a large number of files to a nearly full hard drive. |
| “Error during scan” | Corrupted drive sectors, malware interference, or insufficient system resources. | Run a disk check utility (like CHKDSK in Windows), scan for malware, and ensure sufficient RAM and processing power are available. Try restarting your computer. | A Recuva scan stops unexpectedly while attempting to recover files from a heavily fragmented hard drive. |
| Files not found or recovered | Files were overwritten, the drive was formatted, or the files were deleted too long ago. | Try Recuva’s deep scan option. If the files were overwritten, recovery may be impossible. Data recovery software often has limited success with older deletions. | Attempting to recover files that were deleted several weeks ago and the space has been overwritten multiple times. |
Causes of Failed Recovery Attempts
Several factors contribute to failed recovery attempts. The most significant is data overwriting. Once deleted data is overwritten by new data, recovery becomes exponentially more difficult, if not impossible. Other factors include drive corruption, malware infection, and the age of the deleted files. The longer a file has been deleted, the higher the chance of successful recovery diminishes.
A formatted drive also significantly reduces recovery chances.
Improving Recuva’s Recovery Success Rate
To increase the likelihood of successful file recovery, act quickly after deletion. Avoid writing new data to the drive where the files were deleted. Use Recuva’s deep scan option for thorough searching. Consider using a dedicated data recovery lab for extremely difficult recovery scenarios. Regularly backing up important files is the best preventative measure against data loss.
This proactive approach significantly minimizes the risk of irretrievable data loss.
Final Wrap-Up
So, there you have it – a deep dive into the world of Recuva. From its surprisingly intuitive interface to its powerful deep scan capabilities, Recuva proves to be a remarkably effective tool for recovering lost data. While it’s not a magic bullet (some files are truly gone for good!), understanding its strengths and limitations will equip you to tackle your next data mishap with confidence.
Remember, prevention is key, but when things go wrong, Recuva has your back (or rather, your hard drive’s!).
Query Resolution
Can Recuva recover files from formatted drives?
It can attempt to, but success isn’t guaranteed. Formatting overwrites the file system, making recovery harder. A deep scan might yield results, but don’t get your hopes too high.
Is Recuva free to use?
Yes, Recuva offers a free version with most of its core features. There’s also a paid version with some extra tools, but the free one is usually more than enough for most users.
How do I prevent data loss in the future?
Regular backups are your best bet! Use cloud storage, external hard drives, or even a second internal drive to create copies of your important files. Also, be extra careful when deleting things – double-check before you hit delete!
What’s the difference between a “quick scan” and a “deep scan”?
A quick scan checks readily available file system information, while a deep scan digs deeper into the drive’s raw data. Deep scans take longer but find more files, especially if they’ve been completely deleted.
Can Recuva recover files from an external hard drive?
Absolutely! Recuva works with a variety of storage devices, including external hard drives, USB flash drives, and memory cards. Just select the correct drive in Recuva.