Metashape, a powerful photogrammetry software, transforms ordinary photos into extraordinary 3D models. This isn’t your grandpappy’s 3D modeling—we’re talking about creating realistic, detailed models from a series of overlapping images. Think of it as digital archaeology, but instead of digging up bones, you’re building up incredibly accurate 3D representations of anything from ancient ruins to your latest sculpture project.
We’ll explore the ins and outs of Metashape, from image acquisition to model refinement, uncovering its capabilities and applications across various fields.
This guide will walk you through the entire Metashape workflow, covering everything from setting up your camera to exporting your finished model. We’ll delve into the software’s core functionalities, compare it to other photogrammetry options, and explore advanced techniques for optimizing your models. Whether you’re a seasoned pro or a curious beginner, get ready to unlock the potential of Metashape.
Metashape Software Overview
Metashape, formerly known as Photoscan, is a powerful and widely used photogrammetry software package. It’s known for its robust feature set, allowing users to create high-quality 3D models and point clouds from various image sources. Its user-friendly interface, while possessing a learning curve, makes it accessible to both beginners and experienced professionals.Metashape’s core functionality revolves around processing digital images to generate accurate 3D representations of real-world objects or environments.
This process, known as photogrammetry, involves taking overlapping photographs from different angles and using specialized software to analyze the images, identifying common features and reconstructing the geometry and texture of the scene. The software automatically aligns images, generates dense point clouds, creates mesh models, and applies textures to create realistic 3D outputs.
Input Data Types
Metashape supports a wide range of input data, enhancing its versatility across various applications. The software can handle various image formats, including JPEG, TIFF, and others, and accommodates images from various cameras, including DSLR cameras, multirotor drones, and even mobile phones. Furthermore, it’s capable of processing images with varying levels of quality and resolution, making it adaptable to a wide array of projects, from high-resolution architectural scans to lower-resolution drone surveys.
The software’s ability to handle different camera parameters and image characteristics makes it highly flexible for diverse project needs. It can also incorporate GPS data to georeference models, making it particularly useful for mapping and surveying applications.
Comparison with Other Photogrammetry Software
Metashape stands out among other photogrammetry software options due to its balance of user-friendliness and powerful features. While programs like RealityCapture are often praised for their accuracy and processing speed on very large datasets, Metashape offers a more accessible interface and a broader range of functionalities, making it suitable for a wider range of users and project scales. Other options, such as Pix4D, might offer more streamlined workflows tailored to specific applications (like drone mapping), but Metashape’s versatility allows it to tackle a wider array of tasks.
Ultimately, the best choice depends on specific project needs and user expertise, but Metashape’s robust feature set and relative ease of use make it a compelling choice for many users. The comparison often boils down to a trade-off between processing speed, accuracy, ease of use, and the specific types of projects being undertaken. For example, a large-scale infrastructure project might benefit from RealityCapture’s speed and accuracy, while a smaller-scale architectural project might find Metashape’s user interface more approachable.
Metashape Workflow Stages
Okay, so you’ve got Metashape, a powerful photogrammetry software. But how do you actuallyuse* it to create 3D models? Let’s break down the typical workflow, step-by-step. Think of it like a recipe – follow the instructions, and you’ll get a delicious 3D model.
The Metashape workflow is a series of interconnected processes, each building upon the previous one. Properly configuring parameters at each stage is crucial for optimal results, impacting factors like model accuracy, texture quality, and overall processing time. Let’s dive into the details.
Metashape Processing Pipeline
The entire process can be visualized as a pipeline, where data flows from one stage to the next. Below is a simplified representation using a table to illustrate this sequential nature.
| Stage | Description |
|---|---|
| Image Import | This initial step involves loading your source images into Metashape. Ensure your images are properly calibrated and have sufficient overlap for optimal point cloud generation. Consider factors like image resolution, camera type, and lighting conditions. The more images you have, the more accurate your model will likely be, but processing time will increase. For example, if you’re modeling a small object, a few dozen high-resolution images might suffice. For a large-scale project, hundreds or even thousands might be necessary. |
| Alignment | Metashape uses the image data to determine the relative positions and orientations of the cameras. This involves feature detection, matching, and bundle adjustment. Experimenting with different alignment parameters, such as accuracy and keypoint limits, will influence the precision of your model and processing time. Higher accuracy settings will result in more accurate alignment but may increase processing time. |
| Dense Cloud Generation | Based on the aligned images, Metashape creates a dense point cloud – a massive collection of 3D points representing the surface of your object or scene. The quality of the dense cloud directly impacts the final model’s fidelity. Parameters like depth filtering and filtering strength directly influence the noise reduction and detail preservation in your point cloud. For instance, increasing the depth filtering strength can remove noise but may also lose fine details. |
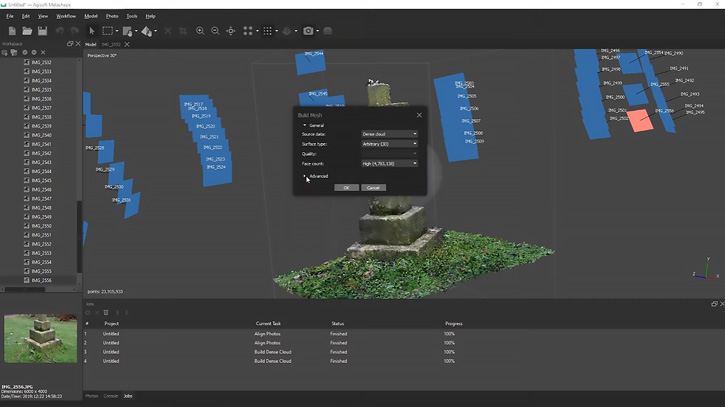
| Mesh Generation | A 3D mesh is constructed from the dense point cloud. This creates a surface representation of your model. Metashape offers various meshing algorithms, each with its own strengths and weaknesses. Parameters like face count and surface smoothing directly affect the model’s polygon count and visual smoothness. Higher polygon counts result in more detailed models but require more processing power and storage. |
| Texture Generation | A texture is applied to the mesh, creating a realistic visual representation. Metashape uses the original images to create a photorealistic texture. Parameters like blending mode and texture size influence the final texture’s appearance and file size. Larger textures offer higher resolution but increase file sizes. |
| Model Export | Finally, the completed 3D model can be exported in various formats (e.g., OBJ, FBX, 3DS) depending on your needs and the target application. This allows you to use the model in other software for further processing or visualization. |
Processing Parameters and Their Impact
Metashape offers a wide range of processing parameters that significantly influence the final output. Understanding these parameters is crucial for achieving high-quality results. Each stage in the workflow provides opportunities for fine-tuning.
For instance, during alignment, you can adjust the keypoint limit, affecting the number of matching points used for alignment. A higher limit increases accuracy but also processing time. During dense cloud generation, depth filtering helps remove noise but may also lose fine details. Finding the right balance is key. Similarly, mesh generation parameters, such as face count, directly influence the level of detail in the final mesh.
A higher face count leads to a more detailed model but also increases file size and processing time.
Image Acquisition for Metashape
Getting good images is the absolute foundation of a successful Metashape project. No matter how powerful the software is, garbage in, garbage out, right? So, before you even think about opening Metashape, let’s talk about capturing the perfect photogrammetry dataset. This involves understanding your camera settings and employing smart shooting techniques.Optimal camera settings and shooting techniques are crucial for generating high-quality 3D models in Metashape.
The better your input images, the better your results will be – it’s that simple. Factors like camera resolution, lens distortion, and lighting conditions significantly impact the accuracy and detail of the final 3D model.
Camera Settings and Shooting Techniques
Using the right camera settings is key to getting great results. First, shoot in the highest resolution your camera allows. More pixels mean more detail in your final model. Avoid using the zoom function unless absolutely necessary; it often introduces distortion that Metashape has to struggle with. Also, make sure your camera’s focus is sharp.
Blurry images are a huge problem for photogrammetry. Finally, shooting in RAW format is highly recommended. RAW files contain more image data than JPEGs, allowing for better corrections during post-processing and yielding more accurate results in Metashape. Consider using a tripod for consistently sharp images, especially for larger objects or scenes. Using a remote shutter release minimizes camera shake.
Okay, so Metashape’s photogrammetry is seriously cool for creating 3D models, right? But think about how you could use those models – maybe integrating them into a sales process managed by a system like crm salesforce to show clients a realistic preview of a remodel. Then you could use Metashape’s output to up your sales game, making the whole thing super efficient.
Best Practices for Image Acquisition
Preparing for your shoot is half the battle. Here’s a checklist of best practices to follow for capturing images ideal for 3D model reconstruction:
- High Resolution: Utilize the maximum resolution your camera offers for detailed models.
- Consistent Overlap: Aim for at least 60-80% overlap between consecutive images, and even more for complex geometries or textured surfaces. This ensures sufficient data for accurate point cloud generation.
- Even Lighting: Avoid harsh shadows and direct sunlight. Even, diffused lighting provides the best results. Consider shooting on an overcast day or using diffusers to soften the light.
- Variety of Angles: Capture images from multiple angles and perspectives to fully encompass the object or scene. Don’t just stick to one side!
- Scale Reference: Include a known-size object (like a ruler or a coin) in at least some of your images to aid in scaling the final 3D model.
- Image Format: Shoot in RAW format for maximum image quality and flexibility in post-processing.
- Tripod Use: Employ a sturdy tripod to minimize camera shake and ensure consistent image quality.
- Multiple Exposures: For high-dynamic-range scenes, consider taking multiple exposures (bracketing) to capture details in both highlights and shadows.
- Check for Motion Blur: Ensure your images are sharp and free of motion blur; this is crucial for accurate alignment in Metashape.
- Avoid Reflections: Minimize reflections on shiny surfaces by adjusting your lighting or camera angles.
Importance of Image Overlap and Ground Control Points (GCPs)
Image overlap and GCPs are critical for accurate 3D model reconstruction. Insufficient overlap leads to gaps and inaccuracies in the model, while GCPs provide a real-world reference system for geometric accuracy.Sufficient image overlap is essential because Metashape uses common features in overlapping images to align and stitch them together to create a 3D model. The more overlap, the more data Metashape has to work with, resulting in a denser point cloud and a more accurate model.
A general rule of thumb is to aim for at least 60-80% overlap, but more is often better, especially for complex shapes or highly textured objects.Ground Control Points (GCPs) are points in the real world whose coordinates are precisely known. By identifying these points in your images, you provide Metashape with a reference framework to accurately scale and georeference your 3D model.
GCPs are especially important for large-scale projects or when high accuracy is required. They significantly improve the accuracy and reliability of the final model, particularly its geometric accuracy and real-world scale. Accurate GCP measurements using a high-precision GPS or total station are essential for optimal results.
Metashape Model Processing Techniques
Okay, so you’ve got your images, you’ve aligned them, and now it’s time to get down to the nitty-gritty of creating that awesome 3D model in Metashape. This section dives into the different techniques and parameters you can tweak to get the best results for your project. We’ll look at the alignment algorithms, factors affecting model quality, and how to optimize settings for speed versus accuracy.Metashape offers several powerful alignment algorithms, each with its strengths and weaknesses.
The choice depends heavily on the nature of your project, the quality of your source imagery, and your tolerance for processing time. Understanding these differences is key to getting the best possible results.
Metashape Alignment Algorithms: A Comparison
The core of Metashape’s processing lies in its alignment algorithms. The software offers several options, each employing different approaches to matching features between images and constructing a dense point cloud. High-accuracy alignment is crucial for creating realistic and accurate 3D models. Let’s examine some of the key differences between these algorithms. For example, the “Generic” algorithm is a robust, general-purpose option, often a good starting point for many projects.
It balances speed and accuracy effectively. In contrast, the “Accurate” algorithm prioritizes precision, spending more processing time to refine the alignment, leading to higher accuracy but longer processing times. The “Robust” algorithm is designed to handle challenging datasets with significant variations in lighting, perspective, or image quality, making it a solid choice for less-than-ideal image sets. The choice between these ultimately depends on your project’s needs.
A quick project might benefit from “Generic,” while a high-precision architectural survey would benefit from “Accurate.”
Factors Influencing 3D Model Accuracy and Quality
Several factors significantly impact the final quality of your Metashape model. These aren’t just about the software; they’re about the entire workflow, from image acquisition to processing parameters. For example, the quality of your source imagery is paramount. High-resolution images with good overlap and minimal distortion lead to much better results. The number of images also plays a crucial role.
More images generally result in denser point clouds and more accurate models, especially in complex scenes. Lighting conditions during image acquisition also matter; consistent, even lighting minimizes shadows and improves feature detection. Furthermore, the camera’s geometry and lens distortion also impact the accuracy; properly calibrated cameras yield superior results. Finally, careful selection of processing parameters within Metashape itself fine-tunes the model generation process, enabling optimization for either speed or accuracy based on the project’s demands.
Optimizing Metashape Processing Parameters
Let’s say you’re working on a large-scale project where processing time is a major constraint. You might choose to prioritize speed over absolute accuracy. In Metashape, you can adjust parameters like the “keypoint limit” to reduce the number of features detected and matched, speeding up the alignment process. Conversely, if accuracy is paramount—like in a precise engineering application—you’d want to increase the “tie points density” to ensure a higher concentration of points for accurate surface reconstruction.
You can also adjust the “depth filtering” parameters to control the removal of outliers in the point cloud. The “quality” parameter in the dense cloud generation step directly affects processing time and the level of detail in the final model. A higher quality setting yields a denser, more detailed model but at the cost of increased processing time.
The trade-off between speed and accuracy is always a consideration, and Metashape provides the tools to fine-tune this balance based on project needs. For instance, a quick architectural visualization might use lower quality settings, while a precise model for construction would require higher quality settings, even if it takes longer.
Metashape Model Refinement and Editing
Okay, so you’ve got your 3D model from Metashape – congrats! But it’s probably not perfect. Think of it like a rough clay sculpture; it needs some refining to become a polished masterpiece. This section covers the crucial steps in cleaning up your model, enhancing its texture, and generally making it look amazing.
Model refinement in Metashape involves a series of iterative steps focused on cleaning up imperfections, enhancing detail, and improving the overall visual quality. This process often requires a blend of automated tools and manual adjustments, depending on the complexity of the model and the desired level of detail.
Model Cleaning and Refinement Techniques
Metashape offers several tools to address common issues like holes, noise, and artifacts in your 3D model. These imperfections often stem from issues during image acquisition or processing. For example, occlusions in the source images can lead to holes in the mesh, while poor image quality or inconsistent lighting can result in noisy textures. Addressing these problems significantly improves the model’s overall appearance and usability.
One effective technique is using Metashape’s built-in mesh filtering tools. These tools allow you to smooth the mesh, reducing noise and filling in small holes. Experimentation with different filter settings is key to finding the optimal balance between smoothing and preserving fine details. Additionally, manual editing using tools like vertex manipulation can be used to carefully address more complex imperfections.
For larger holes, you might consider using a hole-filling tool or even manually modeling the missing geometry.
Texture Mapping and Surface Quality Enhancement
The quality of your texture map directly impacts the realism and visual appeal of your 3D model. Metashape automatically generates textures, but these often need some tweaking. You can adjust the texture resolution to balance detail with file size. Also, you can improve the appearance of the texture by experimenting with different texture mapping algorithms. For instance, you might find that adjusting the texture projection method – like using planar or cylindrical projections – yields better results depending on the model’s geometry.
Furthermore, you might need to address texture seams or artifacts by manually editing the texture in an external image editor.
Improving surface quality goes hand-in-hand with texture mapping. Things like normal maps and displacement maps can significantly enhance the perceived surface detail. A normal map adds surface detail without increasing polygon count, giving a more realistic look to the model. A displacement map actually modifies the mesh geometry itself, creating more intricate surface variations. Both techniques require specialized software for creation, but their integration with your Metashape model dramatically improves visual quality.
Error and Artifact Handling
Even with careful planning and processing, errors and artifacts can creep into your Metashape model. These could manifest as holes, incorrect geometry, or texture distortions. Identifying and correcting these errors is a crucial part of the refinement process.
Common artifacts include ghosting (doubled or blurry areas), misalignments, and texture stretching. Ghosting often arises from poorly aligned images, requiring revisiting the alignment step in Metashape. Misalignments can be manually corrected using the editing tools within the software. Texture stretching, frequently observed in areas with high curvature, can sometimes be minimized by adjusting the texture projection method or using a higher-resolution texture.
Sometimes, the best approach might be to reprocess the model with adjustments to the initial parameters, like increasing the image overlap or improving the camera calibration.
Metashape Model Export Options
Okay, so you’ve built your awesome 3D model in Metashape. Now what? Time to export! Metashape offers a variety of export options, each with its own strengths and weaknesses. Choosing the right format depends entirely on your intended use. Let’s break down the most common options.
The selection of an appropriate export format is crucial for ensuring compatibility with downstream applications and maintaining the desired level of detail and file size. Factors to consider include the intended use of the model (e.g., visualization, analysis, 3D printing), the target software, and the required level of geometric accuracy and texture resolution.
Supported Export Formats and Their Properties
Metashape supports a range of export formats catering to various applications. These include formats suitable for visualization, CAD software integration, 3D printing, and more. Understanding the nuances of each format is key to efficient workflow management.
| Format | File Size | Compatibility | Application |
|---|---|---|---|
| PLY (Polygon File Format) | Medium to Large; depends on model complexity and resolution | Widely compatible with many 3D software packages | General 3D model exchange, visualization, 3D printing (often requires further processing) |
| OBJ (Wavefront OBJ) | Medium to Large; depends on model complexity and resolution | Very widely compatible, a common industry standard | General 3D model exchange, visualization, animation, game development |
| FBX (Filmbox) | Medium to Large; depends on model complexity and resolution; can include animation data | Widely compatible with many 3D software packages, including animation and game engines | General 3D model exchange, animation, game development, visualization |
| COLLADA (COLLAborative Design Activity) | Medium to Large; depends on model complexity and resolution | Widely compatible, designed for collaborative design workflows | General 3D model exchange, particularly in collaborative design environments |
| 3DS (3D Studio) | Small to Medium; depends on model complexity and resolution; often lower detail | Compatibility is more limited than other formats; mainly legacy software | Limited use; mostly for older 3D modeling software |
| LAS (LASer Scan) | Medium to Large; depends on point cloud density | Specialized format for point cloud data; used in GIS and surveying software | Point cloud processing, GIS applications, surveying |
| XYZ (XYZ point cloud) | Medium to Large; depends on point cloud density | Simple text-based format; relatively easy to process with custom scripts | Point cloud processing, custom data analysis |
| GeoTIFF (Georeferenced TIFF) | Large; depends on resolution and size of the orthomosaic | Widely used for geospatial imagery; compatibility with GIS software | Orthomosaic creation and geospatial analysis |
| TIFF (Tagged Image File Format) | Large; depends on resolution and size of the orthomosaic or texture | Widely compatible with image editing and processing software | Orthomosaic or texture export for use in image editing or other applications |
Metashape Applications in Various Fields
Metashape’s power lies in its versatility. It’s not just a software; it’s a powerful tool transforming how we approach data acquisition and analysis across numerous disciplines. Its ability to create accurate 3D models from images opens doors to detailed investigations and precise measurements in fields previously limited by traditional surveying methods. This section will explore some key applications of Metashape in archaeology, architecture, engineering, and environmental monitoring.
The applications of photogrammetry software like Metashape are incredibly broad, extending far beyond simple 3D modeling. The ability to generate highly accurate and detailed 3D models from overlapping photographs has revolutionized many industries, providing new insights and opportunities for analysis and preservation.
Metashape in Archaeology and Heritage Preservation
Metashape provides archaeologists with a non-destructive method for documenting and analyzing archaeological sites. Imagine excavating a delicate ancient ruin: traditional methods might damage the site. However, using Metashape, researchers can capture high-resolution images, creating a precise 3D model that allows for detailed virtual examination and analysis without physically touching the artifacts. This is particularly valuable for fragile sites or artifacts that are difficult or impossible to remove for study.
For example, researchers have used Metashape to create detailed 3D models of ancient Mayan ruins, allowing for virtual reconstruction and analysis of building techniques and the site’s layout without disturbing the original structure. The resulting models can be shared with colleagues worldwide, facilitating collaborative research and analysis. Furthermore, these digital records provide invaluable backups, safeguarding the heritage for future generations, even if the physical site suffers damage.
Metashape in Architecture and Engineering
In architecture and engineering, Metashape aids in creating as-built models of structures. This is crucial for renovations, extensions, or structural analysis. Instead of relying on time-consuming manual measurements, architects and engineers can capture images of a building, and Metashape processes these into a highly accurate 3D model. This allows for precise measurements, identification of structural issues, and planning for future modifications.
For instance, Metashape can be used to create a detailed 3D model of a historic bridge, enabling engineers to assess its structural integrity and plan necessary repairs or renovations. The software’s ability to generate orthomosaics also provides high-resolution, georeferenced images useful for site planning and documentation. This eliminates the need for extensive manual surveying, saving time and resources.
Metashape in Environmental Monitoring and GIS
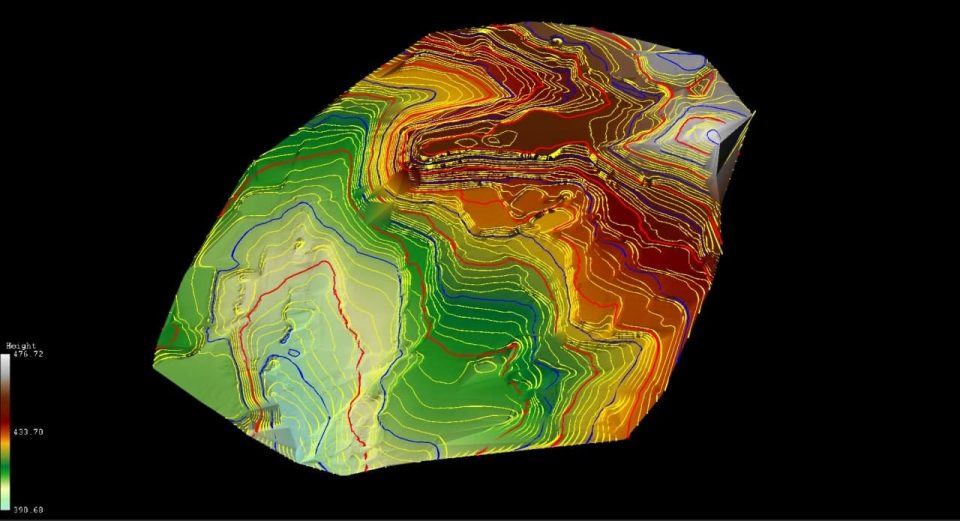
Environmental monitoring and GIS benefit greatly from Metashape’s capabilities. Creating accurate 3D models of landscapes allows for precise measurement of changes over time. This is particularly useful for monitoring deforestation, erosion, or the impact of natural disasters. For example, researchers can use Metashape to create 3D models of a coastline before and after a hurricane, enabling precise measurement of coastal erosion and informing mitigation strategies.
The resulting models can be integrated into GIS systems, allowing for spatial analysis and visualization of environmental changes. Furthermore, Metashape’s ability to generate orthomosaics provides high-resolution images that can be used for vegetation mapping, habitat analysis, and other environmental studies. This detailed data contributes to a more comprehensive understanding of environmental processes and informs conservation efforts.
Advanced Metashape Features
Metashape offers a powerful suite of advanced tools beyond the basic workflow, allowing for highly detailed processing and manipulation of 3D models. These features enable users to refine their models to a level of accuracy and detail previously unimaginable, opening up possibilities for more sophisticated applications across various fields. This section delves into some of Metashape’s most potent advanced capabilities.
Metashape’s Point Cloud Processing Tools
Metashape’s point cloud processing tools are crucial for manipulating and refining the raw data acquired during image processing. These tools allow for the cleaning, classification, and manipulation of the massive point cloud datasets generated. For instance, noise reduction algorithms filter out spurious points, improving the overall quality of the 3D model. Point cloud classification tools allow users to segment points based on attributes like color or intensity, enabling the identification and separation of different features within the model.
Furthermore, tools for point cloud decimation allow users to reduce the overall number of points while retaining essential detail, making the models more manageable for further processing and visualization. This is particularly useful for extremely large datasets which may be computationally expensive to work with otherwise. Advanced filtering options, such as those based on normal vector orientation, allow the removal of points that don’t conform to the overall surface geometry.
This greatly enhances model quality, removing artifacts and irregularities.
Metashape’s Mesh Editing Tools
Once a mesh is generated from the point cloud, Metashape provides a range of tools for editing and refining its geometry. These tools go beyond simple smoothing and allow for more precise control over the model’s shape and appearance. For example, users can manually edit the mesh vertices, edges, and faces to correct imperfections or add details. Tools for hole filling can automatically close gaps in the mesh, creating a more complete and visually appealing model.
Furthermore, texture painting tools allow users to directly modify the surface texture of the mesh, adding or removing details or adjusting color and shading. The ability to selectively smooth or sharpen different parts of the mesh allows for targeted refinement, improving the overall realism of the model. These editing capabilities are particularly important when working with complex or challenging datasets where automatic processing may not produce perfect results.
Consider, for instance, the reconstruction of a highly detailed building façade – manual mesh editing would be essential to correct inaccuracies and add fine architectural details.
Orthomosaic Creation in Metashape
Orthomosaics are georeferenced mosaics of images that are geometrically corrected to eliminate perspective distortion. Metashape’s orthomosaic generation tools produce high-resolution, accurate maps from aerial or ground-based imagery. The process involves using the camera positions and orientations derived during alignment, along with the 3D model, to project the images onto a flat plane. The resulting orthomosaic provides a planimetrically correct representation of the area, making it ideal for tasks such as mapping, surveying, and urban planning.
The software provides options for controlling the resolution, color balance, and other parameters of the final orthomosaic, allowing users to tailor the output to their specific needs. For example, the choice of interpolation method can significantly affect the appearance of the orthomosaic, with different methods being better suited for different types of imagery and applications. The ability to export orthomosaics in various formats, including GeoTIFF, further enhances the versatility of this feature.
A high-resolution orthomosaic created from drone imagery could be used to monitor changes in a construction site over time, providing valuable information for project management.
Troubleshooting Common Metashape Issues
Okay, so you’ve dived into the world of photogrammetry with Metashape, and things aren’t going exactly as planned. Don’t worry, it happens to the best of us! Metashape, while powerful, can sometimes throw some curveballs. This section will cover some common problems and how to tackle them. We’ll focus on practical solutions you can implement to get back on track.
Troubleshooting in Metashape often involves understanding the source of the problem – is it your images, your processing settings, or something else entirely? Systematically investigating each stage of the workflow helps pinpoint the issue and find a solution. Remember, patience is key!
Common Metashape Errors and Their Solutions
This table provides a quick reference for some frequently encountered Metashape errors, their causes, solutions, and preventative measures. Remember to always check Metashape’s logs for more detailed error messages.
| Error | Cause | Solution | Prevention |
|---|---|---|---|
| Alignment Failure: Insufficient Overlap | Images lack sufficient overlap (typically at least 60-80%) or have poor image quality. | Re-shoot images with better overlap, focusing on ensuring sufficient common features between consecutive images. Consider increasing the matching accuracy settings in Metashape. If the problem persists, try using a different alignment algorithm. | Plan your image acquisition carefully, ensuring adequate overlap and using a consistent camera position. Use a checkboard or other suitable target for precise overlap control. |
| Model Reconstruction Failure: Insufficient Features | Images lack sufficient texture or distinct features for point cloud generation. This is common with very uniform or featureless scenes. | Try using images with more texture or detail. If possible, acquire additional images from different angles. Consider adjusting the tie point density and quality settings. | Choose image acquisition locations that provide diverse texture and feature information. Avoid shooting uniform surfaces like plain walls or featureless fields without sufficient texture. |
| Mesh Generation Failure: Insufficient Points | The point cloud generated during alignment is too sparse to create a dense mesh. | Improve the point cloud density by adjusting the alignment parameters (e.g., increasing the tie point limit). If the point cloud remains sparse, review the image quality and overlap. | Ensure high-quality images with good overlap are used. Consider using higher-resolution images if possible. |
| Texture Generation Failure: Low Image Quality | The input images have low resolution or poor quality, resulting in a poorly textured model. | Use higher-resolution images or acquire additional images to improve the texture quality. Adjust the texture blending parameters. | Use high-resolution images with good lighting conditions and minimal noise. |
| Out of Memory Error | Metashape requires significant RAM to process large datasets. Processing high-resolution images or very large datasets can exceed available memory. | Reduce the image resolution, use a more powerful computer with more RAM, or process the data in smaller chunks. | Use a computer with sufficient RAM and processing power. Consider processing the data in smaller batches. |
Metashape’s User Interface and Navigation
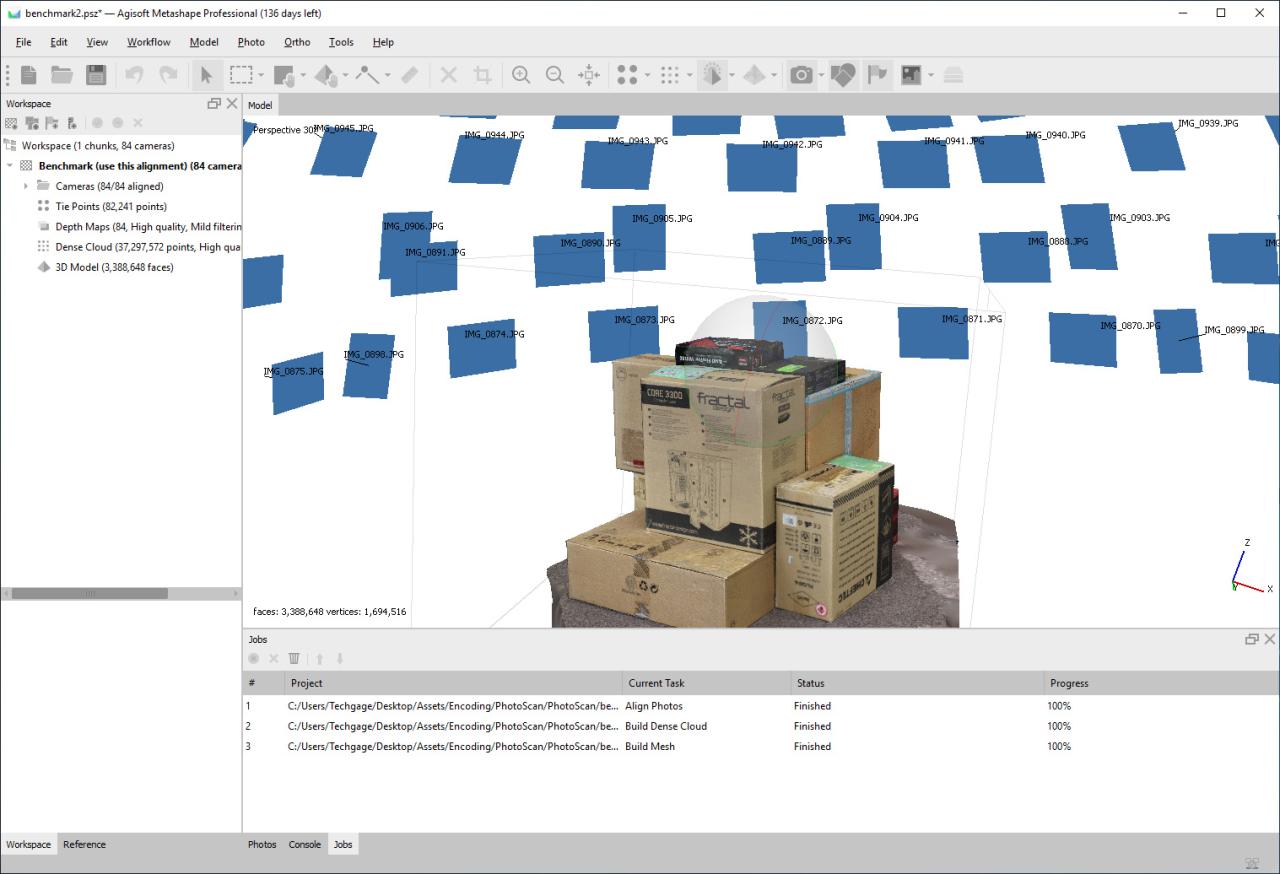
Metashape’s interface, while initially appearing complex, is logically organized and becomes intuitive with practice. Understanding its layout and the function of its various components is key to efficient model creation. This section provides a guided tour of the software’s main features and how to navigate them.
The Metashape interface is primarily composed of a main window displaying the 3D model, various toolbars providing quick access to common functions, and menus offering more extensive control. The layout is customizable, allowing users to arrange the workspace to suit their preferences. Effective navigation relies on understanding the interplay between these elements.
Main Window and Viewports
The main window is the heart of Metashape, displaying the 3D model from different perspectives. Multiple viewports can be arranged, offering simultaneous views from various angles (e.g., top, front, side). Each viewport provides tools for zooming, panning, and rotating the model. Navigation within these viewports is primarily achieved using the mouse; left-click to select, right-click for context menus, and scroll wheel for zooming.
The main window also displays the alignment status, model quality, and other relevant information.
Toolbars and their Functionality
Metashape’s toolbars offer quick access to frequently used functions. The exact toolbars present may vary slightly depending on the active workflow stage. However, common elements include buttons for:
- New Project: Creates a new project to start processing a new dataset.
- Open Project: Opens an existing Metashape project.
- Save Project: Saves the current project, preserving all data and settings.
- Add Images: Imports the images used for model creation.
- Align Photos: Starts the image alignment process, a crucial step in model generation.
- Build Mesh: Generates a 3D mesh from the aligned images.
- Build Texture: Creates a textured surface on the 3D mesh.
- Navigation Controls: Tools for zooming, panning, and rotating the 3D model within the viewports.
These buttons streamline the workflow, eliminating the need to navigate through menus for common tasks. Their functionality is consistent across various stages of the workflow.
Menus and their Functions, Metashape
The menus, accessible via the top menu bar, offer more comprehensive control over various aspects of Metashape. These menus are categorized logically and contain submenus that provide granular control. For example, the “Workflow” menu contains options for each stage of the processing pipeline, allowing for fine-tuning of parameters. The “Tools” menu offers specialized tools for model editing, measurement, and analysis.
The “Window” menu allows for managing the layout and visibility of different elements within the interface. “Help” provides access to Metashape’s documentation and support resources.
Visual Guide to Key Interface Elements
Imagine a screen showing the Metashape main window. At the top is the menu bar with options like “Workflow,” “Tools,” “Window,” and “Help.” Below this is a series of toolbars with icons representing common functions, such as “Add Images,” “Align Photos,” and “Build Mesh.” The majority of the screen is occupied by the main viewport, displaying a 3D model.
Multiple smaller viewports can be arranged around the main viewport. The status bar at the bottom displays information about the current project and the progress of any ongoing tasks. A panel on the side, often dockable, provides options and settings for the current tool or workflow stage.
- Menu Bar: Topmost bar containing file management, workflow, and help options.
- Toolbars: Horizontal bars with icons for quick access to common functions.
- Main Viewport: The primary window for viewing and manipulating the 3D model.
- Additional Viewports: Smaller windows offering different perspectives of the model.
- Side Panel: Dockable panel for detailed settings and options.
- Status Bar: Bottom bar providing information on project status and progress.
Future Trends and Developments in Metashape
Metashape, already a powerful photogrammetry software, is poised for significant advancements in the coming years. We can expect improvements across the board, from increased automation and efficiency to enhanced integration with other technologies and the expansion into new application areas. The future of Metashape is bright, driven by both internal development and the ever-evolving needs of its user base.
Several key areas are ripe for development. Increased automation will streamline workflows, making Metashape more accessible to users with varying levels of expertise. Integration with other software packages, particularly those involved in 3D modeling, animation, and game development, will expand the possibilities for creative professionals. Finally, new applications are emerging as the technology matures, pushing the boundaries of what’s possible with photogrammetry.
Enhanced Automation and Efficiency
Metashape already offers a degree of automation, but future versions could significantly reduce manual intervention. Imagine a system that automatically identifies and corrects image distortions, optimizes processing parameters based on image characteristics, and even generates textured 3D models with minimal user input. This would dramatically reduce processing time and lower the barrier to entry for new users, allowing more individuals and smaller companies to leverage the power of photogrammetry.
This level of automation could be achieved through the implementation of advanced machine learning algorithms capable of analyzing image data and making intelligent decisions regarding processing parameters. For example, the software could automatically select optimal alignment parameters based on image overlap and quality, or even identify and remove problematic images from the processing pipeline.
Improved Integration with Other Software
Seamless integration with industry-standard software packages is crucial for Metashape’s continued success. Currently, Metashape exports models in various formats, but future developments could involve direct plugins or APIs allowing for a more fluid workflow. Imagine a pipeline where a Metashape-generated model is directly imported into a game engine like Unity or Unreal Engine, bypassing the need for manual conversion and cleanup.
Similarly, tighter integration with CAD software could streamline workflows for architects and engineers. This level of integration could be achieved through the development of dedicated plugins or APIs that allow for direct data exchange between Metashape and other software packages. This would eliminate the need for manual data conversion and ensure a more efficient and streamlined workflow.
For example, a plugin could allow users to directly import a Metashape model into a CAD program like AutoCAD or Revit, preserving the model’s geometry and texture information.
Expansion into New Application Areas
The applications of photogrammetry are constantly expanding. Metashape could play a significant role in emerging fields such as virtual and augmented reality, heritage preservation, and precision agriculture. Imagine using Metashape to create highly detailed 3D models of historical artifacts for virtual museum tours, or to monitor the growth and health of crops in real-time using drone imagery. The development of specialized tools and workflows within Metashape tailored to these specific applications would significantly broaden its appeal and market reach.
For instance, the development of tools for automated defect detection in infrastructure inspections or the integration of advanced analytics for precision agriculture would open up entirely new markets for the software. This would involve developing new algorithms and features specifically designed for these applications. The integration of AI and machine learning would be crucial in this development, allowing for automated analysis and interpretation of the generated 3D models.
Wrap-Up
From capturing the perfect images to exporting a polished 3D model, mastering Metashape opens up a world of possibilities. We’ve covered the essential workflow, explored advanced features, and tackled common troubleshooting issues. Remember, the key to successful Metashape projects lies in understanding the importance of image overlap, utilizing appropriate processing parameters, and refining your models for optimal results. So grab your camera, start snapping, and let Metashape unleash your inner digital sculptor!
Helpful Answers
What are the system requirements for Metashape?
Metashape’s system requirements vary depending on the project size and complexity. Generally, you’ll need a reasonably powerful computer with ample RAM and a good graphics card. Check the official website for the most up-to-date specs.
Is Metashape suitable for beginners?
While Metashape has a learning curve, its intuitive interface and comprehensive documentation make it accessible to beginners. Plenty of online tutorials and resources are available to help you get started.
How much does Metashape cost?
Metashape offers different licensing options, including a free trial and various paid licenses depending on your needs. Check their website for current pricing.
Can I use Metashape with drone imagery?
Absolutely! Metashape is frequently used to process drone imagery, making it a powerful tool for creating accurate 3D models of large areas.
What file formats can I import into Metashape?
Metashape supports a wide range of image formats, including JPEG, TIFF, and RAW files. Consult the official documentation for a complete list.